Ergo Trail: Over a Decade of Keyboard Hacks
Soldering crimes, TrackPoint surgeries, and firmware experiments
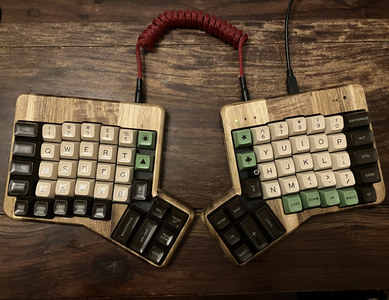
My ErgoDox is now over a decade old.
Since I ordered the parts in 2014, my daily companion has endured drilled holes, salvaged TrackPoint transplants, multiple firmware rewrites, improvised electronics, rerouted PCB traces, and a surprising number of questionable ideas.
Somehow, it is still running.
The Big Pain
Around 2014, while working on my thesis, I started having significant pain in my left pinky finger. Sometimes the pain would spread all the way to the elbow. At the time I was using Emacs heavily, and like many Emacs users, I had already done the usual remapping tricks: Control on CapsLock, various keyboard tweaks, attempts at reducing awkward modifier usage. But it was not enough.
By July 2014, I had given up on Emacs and decided to learn Vim seriously. I bought myself a copy of Vi and Vim from O’Reilly.
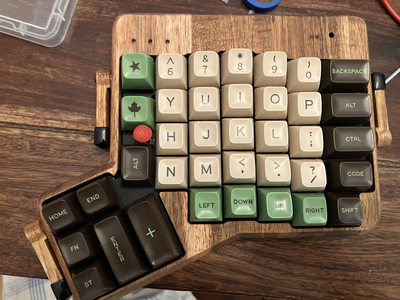
Around that same time I started looking into ergonomic keyboards. Today there are dozens of commercial split keyboards available. Back then, things were much more chaotic. The ErgoDox was mostly a community project. People were building them at home, ordering PCBs from group buys, soldering them manually, discussing layouts in forums and IRC channels.
There was a site called Massdrop where groups of people would collectively order hardware kits. So, in November 2014, I joined a group buy and ordered the parts.
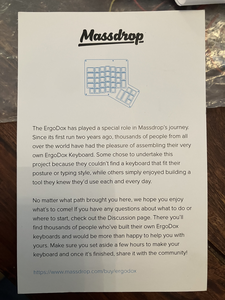
Two weeks ago, while cleaning the basement, I found the original Massdrop thank-you card.
The Massdrop Era
The keyboard arrived around December 2014. Nothing was assembled.
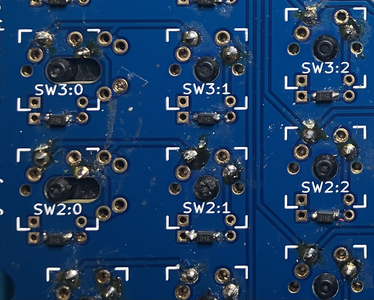
I soldered the whole thing in a single evening using a very cheap soldering iron and my fairly poor fine motor skills. The surface-mounted diodes were especially unpleasant. Holding them in place while soldering felt like trying to pin tiny insects onto a moving board.
The result was objectively terrible, but surprisingly the keyboard worked almost immediately. One diode was soldered backwards, but otherwise the thing somehow survived.
The firmware I used at the time was Ben Blazak’s. QMK did not exist yet. ZMK definitely did not exist. TMK may already have existed, but it was not on my radar yet.
At this point the keyboard was still mostly a tool that I expected to simply use.
That assumption did not survive very long.
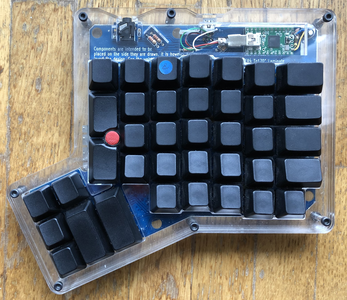
The TrackPoint Era
Since around 2008 I had been using ThinkPads with their famous little red button to control the mouse. The TrackPoint felt strange at first, but eventually something clicked and I became completely attached to it. Once you get used to a pointing device that barely requires hand movement, going back to a normal mouse feels surprisingly disruptive.
At some point I saw forum posts from people trying to integrate a TrackPoint directly into ergonomic keyboards. Naturally, this sounded like an excellent idea at the time.
My first attempt used a generic joystick module, but when I tried implementing mouse movement myself in firmware, it was awful. So I decided to do something much more reasonable: destroy a ThinkPad keyboard.
By lucky coincidence, I had recently ordered a replacement ThinkPad keyboard because I wanted a US layout instead of the German one that came with the laptop. This conveniently left me with a volunteer donor.
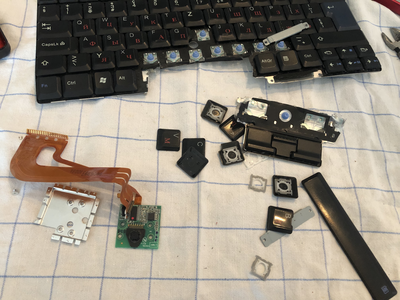
The extraction procedure was partially successful. Due to my spectacularly bad soldering skills, I almost melted the contacts of the PS/2 module while trying to attach wires to it. The resulting wiring was mechanically unstable and looked deeply questionable.
The next challenge was physical integration. Without much consideration, I drilled a hole directly through the ErgoDox PCB and the acrylic bottom layer using a normal wall drill.
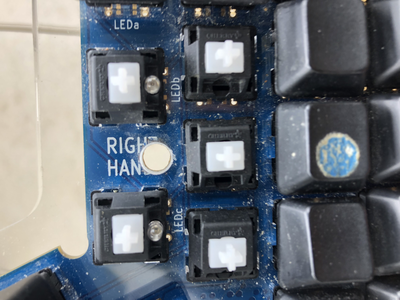
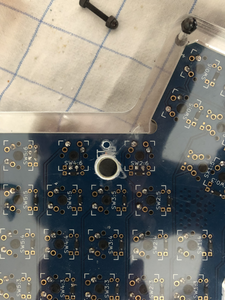
The TrackPoint module was mounted underneath the acrylic layer. Unfortunately, the keys sat significantly higher than the TrackPoint itself, so the pointing stick needed an extension.
Of course, I did not have any perfectly matching part available, so I improvised. The extension was made from a BIC pen. I cut a small piece of plastic tubing, shaped the inside using a knife until it fit onto the TrackPoint stem, and melted portions of it with a lighter so the red TrackPoint cap would attach properly.
It was a catastrophic hack.
And somehow, it worked.
Sometimes.
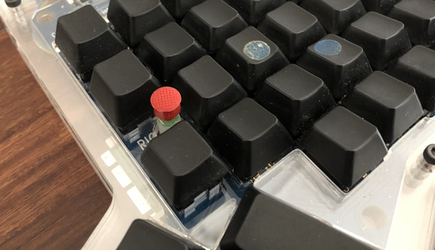
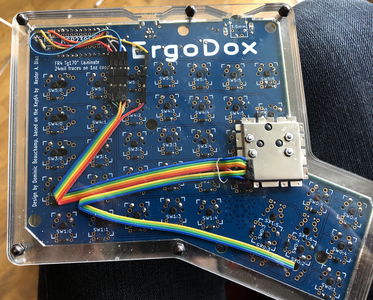
At this point the keyboard had stopped being merely ergonomic hardware.
The firmware situation also became much more complicated. To support PS/2 input I migrated to TMK (or possibly an early QMK version; I honestly do not remember). There were several strategies for reading PS/2:
- pure software polling
- interrupt-driven clock edge handling
- abusing the ATmega32U4 USART hardware in synchronous mode
The USART trick was particularly beautiful. The PS/2 protocol is sufficiently close to synchronous serial communication that the hardware could essentially decode the stream automatically. Unfortunately, the ErgoDox designers had used the necessary PD2 pin for the matrix itself. So I had to settle for interrupt-driven decoding instead.
The Wooden Era
Around 2019 I decided to spend some of my free evenings rebuilding the keyboard using a wooden case (Beech) from FalbaTech.
The acrylic case had always looked temporary. The wooden case felt more permanent, more stable, more like a real long-term tool.
To install the wooden case, every single switch had to be desoldered from the PCB, the metal plate inserted, and then all switches soldered again.
This was simultaneously an opportunity to fix previous soldering crimes and a mechanism for creating entirely new ones.
One switch died during the process and had to be replaced after yet another full desoldering session.
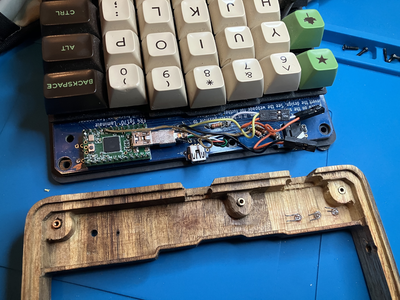
The wooden case also needed substantial modifications. To warm up, I drilled three small holes into the top wooden plate and relocated the ErgoDox LEDs there. That early success gave me enough confidence to transplant the TrackPoint module as well.
The metal switch plate had to be drilled. My wall drill wasn’t as happy with the metal as it was with the acrylic, but it worked. Also, the plastic underside had to be manually carved to make room for the additional electronics.
During this procedure, I learned that a kitchen knife can be a perfectly adequate engineering instrument.
Unfortunately, during the conversion I broke the original TrackPoint module beyond repair.
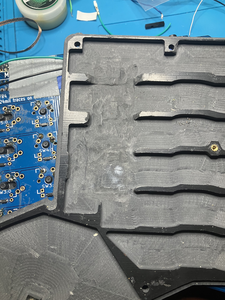
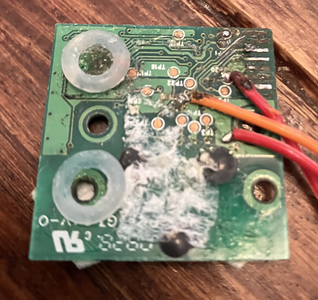
Being somewhat reasonable, I decided not to buy another ThinkPad keyboard merely to salvage a TrackPoint. I started searching for alternatives and found a cheap Chinese TrackPoint module online.
When it arrived, this donor immediately looked suspicious. The board had two chips and connected through USB instead of PS/2.
There was no datasheet whatsoever.
My immediate guess was that one chip implemented the TrackPoint PS/2 interface while the other converted the signal to USB, roughly similar to what I had originally planned to do with the Teensy.
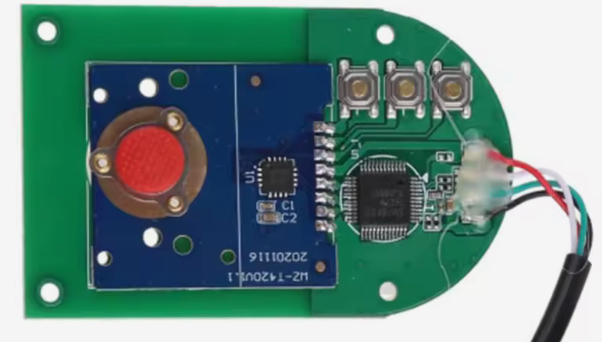
I tried wiring the PS/2 signals directly into the Teensy 2.0 controller in multiple ways, but I could never get the existing firmware support working.
So instead I had to improvise and build something much stranger.
The Chinese module could be broken into two parts:
- TrackPoint + PS/2 chip
- PS/2-to-USB microcontroller
Then I bought a tiny 2-to-1 USB hub board and embedded that inside the keyboard as well.
The internal structure became something like:
┌────────────┐         ┌────────────┐
| TrackPoint |  PS/2   |  PS/2->USB |
|   Encoder  +-------->|    MCU     |
└────────────┘         └─────+──────┘
                             |
                             | USB
                             |
                             v
┌────────────┐         ┌────────────┐
|  ErgoDox   |  USB    |  2-to-1    |  USB
| Teensy 2.0 +-------->|  USB hub   +------>  Connector
└────────────┘         └────────────┘
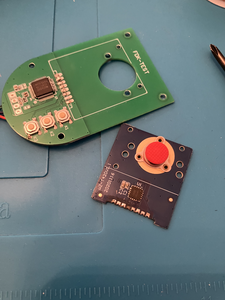
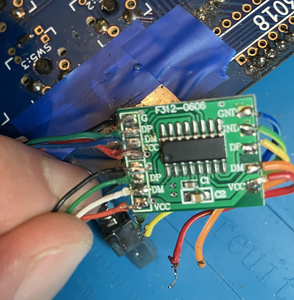
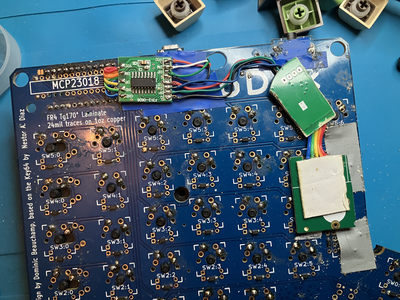
And somehow, unbelievably, it worked.
The Big CRUNCH
Since the TrackPoint was now handled externally through USB, I no longer needed the Teensy firmware itself to understand PS/2. That gave me freedom to experiment with firmware architecture, and eventually I wrote my own firmware in MicroScheme.
After a couple of weeks, I discovered that the author of the Atreus keyboard had independently explored a very similar direction and written an excellent blog post about implementing keyboard firmware in Scheme. Reading that post was reassuring: apparently I was not the only person trying to push tiny keyboard controllers into increasingly questionable directions.
The firmware itself was not especially sophisticated and it somehow worked for the next few years.
The TrackPoint setup itself, however, was fragile. Inside the keyboard there was now a USB hub, a Teensy, a USB microcontroller, and the TrackPoint module itself. The whole thing felt increasingly absurd.
What I really wanted was to return to the simpler architecture of the original ThinkPad transplant: one keyboard controller directly speaking PS/2 to the TrackPoint.
Around 2024 I became interested in CRUNCH, the experimental Scheme-to-C language by the creator of CHICKEN Scheme. I did not want to immediately rewrite an entire keyboard firmware in a new experimental language, so instead I focused on understanding the strange Chinese TrackPoint module properly.
To understand the module better, I built a tiny logic analyzer using the Teensy itself and started decoding the protocol traffic manually. The investigation eventually became its own pair of articles: Cheap and Dirty Logic Analyzer with Teensy and Crunching a PS/2 Mouse Decoder.
The TrackPoint side really was speaking something very close to PS/2, but not quite. Initialization and reset behavior differed subtly from normal PS/2 devices, which finally explained the unreliable behavior from the earlier experiments.
At this point the goal became reducing the architecture back to only two components. That brought me back to the old USART trick.
The original obstacle had been PD2. On the ErgoDox PCB the pin was wired into the key matrix, which made the USART-based decoder impractical without modifying the hardware itself.
Eventually I stopped treating that as fixed. I cut the original PD2 trace with a cutter, rerouted the matrix connection to PD4, and finally freed PD2 for the USART-based PS/2 decoder.
So the trick that had been unavailable in 2017 became the final simplification years later. And cutting the trace didn’t hurt a bit.
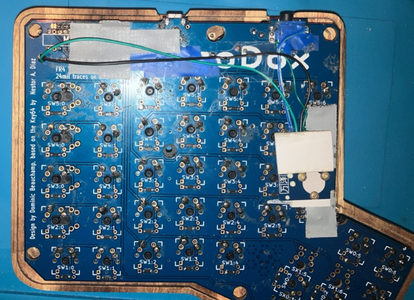
Ironically, during the final simplification process I managed to destroy the Chinese TrackPoint module as well while removing the internal USB hub assembly. So the module shown in some photos is not exactly the same physical unit as the one currently installed.
The replacement turned out to be electrically identical, only with a different PCB color. The original board was green, the replacement blue.
Still Running
As of today, the keyboard is still alive.
Most of the original Cherry MX clears are still there. One switch had to be replaced over the years, but mostly because I was not particularly gentle with it.
The TrackPoint finally behaves smoothly and reliably; the firmware stack keeps evolving; the keyboard keeps accumulating scars.
My family keeps asking why I spend so much time modifying a keyboard. I honestly do not know.
At some point it stopped being merely a peripheral and became a long-term engineering project that happened to sit on my desk every day.
Or perhaps more simply, it became a hobby.